John/Horace
-
Posts
1,833 -
Joined
-
Last visited
-
Days Won
188
Content Type
Profiles
Forums
Gallery
Everything posted by John/Horace
-
 It sounds like either your alternator is not putting out enough power (ecm controls how much alternator charges) or possibly a problem with bad grounds or even main power connections at battery/fuse box. Lots of people on the site have replaced some of the undersized wiring with better gauge wire and cleaned up some of the main grounds (down to clean shiny metal) and then a thin film of dielectric grease. You need a tec with a multi meter and electrical knowledge to check over the main wire harness. Electrical specialist is better option than regular auto mechanic, if you can find one. Even auto starter, sound system installer are reasonable option. Older cars in the rust belt can often have issues with bad electrical connections. Not a simple diy without having some electrical back ground unfortunetly. You have already checked more than a few things yourself like HFM fuse. Bad grounds or corroded connections can create a lot of weird electrical faults with random patterns. May be as simple as post connections on battery. The dash clicking noise may be the blender door venting the cabin air to prevent moisture build up. Most cars do this, it’s around a 2 min cycle of dash louvers. If you-are having condensation issues, then it’s broken like 5rebel9 mentioned and needs changing. But not parasitic load.
 -
According to wiki. The 40TES is used with the 2.4 L GEMA I4 engine
-
All transverse mount V6 engines have this starter motor design. Wife's Santa Fe v6 went over 350k kilometers with original starter. My brothers 3.5 in a Chrysler 300 went to wreckers with original working starter at 310k kms. They are designed with proper internal tolerances to function with the engine heat. These cars run in tropical countries with way more heat.. You can't likely add insulation without creating other problems. A used auto recycler OEM starter can be a better option than a cheap (often china) remanufactured nicely painted unit. If you lightly tap starter at no start and it works again. Probably solenoid contacts sticking. If not maybe armature flat spot or brushes having poor contact from heat expansion. There are some small electrical shops that can rebuild alternator/starters. Or take parts from two bad units to make one good unit.
-
2013 Journey Battery Draining
John/Horace replied to Dodgejourneygirl's topic in Electrical, Battery & Charging
Most common parasitic drain is the Bluetooth module staying on when it shouldn’t. In passenger side kick panel is a fuse panel with a black cover. Look for fuse labeled HFM hand free module, remove it and see if battery stays charged. You will lose your Bluetooth function with fuse removed. The module is very expensive and awkward to get to. Cheapest option is auto wreckers for part or online from rebuilding site. Booster packs sometimes won’t work if battery is really low. If it stills dies with HFM fuse removed then you need someone to troubleshoot what is staying on. Glovebox light it possible, could remove bulb. Leaving stuff plugged in charging in car also not good idea. -
On the original 8.4 factory unit under display and settings...there is a option for control screen timeout. I wonder if that was selected as on. If it was a blank screen only and the entire entertainment system still powered on. Triggering could be firmware issue, but just disabling it could get functionality back. So many buried features on vehicle electronics now, not easy imo. But if you get the android functioning properly, lots of upside with less flaky... better phone operation. Takes time and maybe outside help.

-
Lots of conversion companies. My sons in laws have had two Braun Abilities wheel chair conversions. Their Grand Caravan Dodge is still on the road now. Large company I think Indiana head office, but branches every where. Only one I have looked at closely, nice workman ship. People don’t generally beat on this type of vehicle and high cost encourages proper maint. So sounds like a great deal. You certainly know the mechanical systems well…and you are doing a nice thing for family.
-
Successful BIG BRAKE upgrade on 2011 Crew
John/Horace replied to FROGBOX's topic in Brake, Chassis & Suspension
Soft pedal is fixable with hydraulic brake systems. The rear calipers on these cars with the integrated parking brake set up have a tendency to start to seize up if not constantly used, have experienced it. The return spring becomes not strong enough to fully release pads. You can tell by looking at parking brake mechanism if it’s starting to stick a bit. It also interferes with caliper function so brake bleeding difficult and soft pedal occurs. Either buy a rebuild kit with seals or buy another caliper. The second wheel down in your picture is not wearing evenly, it’s a rear wheel. I would start there. Small 4” piece of clear hose on bleeder screws helps see when air bubbles stop. Cross bleeder pattern front to back starting on passenger rear wheel. Don’t let master go low and allow air in to system. Or pay a mechanic with a vacuum bleeder unit. -
Dodge Journey Factory Roof Rail Replacement
John/Horace replied to meadowinthewoods's topic in Accessories, Modifications
Awful fasteners those one time things. Shouldn’t be used anywhere on cars imo. But roof rack fasteners might just be corroded fastener, can’t really see threads clearly. Maybe a spring type lock washer (not the serrated flat ones) might change the spot where locking needs to occur on the nut. If there is enough thread, can’t tell from pic. So old nut could still be used. Another option is try to find a fine threaded nut close to same diameter, see if it will lock up. Removing section of headliner to run new permanent style fastener up from inside could be a lot of work. Locosiete is the most experienced interior guy on this site. Might answer a pm about roof rack removal. spring washer pic.
-
F42F201E-C61C-4663-8209-EFAFD827A4CC.png
John/Horace posted a gallery image in Dodge Journey Member Albums

-
Starter probably binding internally when heated up. They can fail like this sometimes. New starter over remanufactured unit is usually better. OEM over cheaper aftermarket even better. Mopar on Journey are often Nipodensa, one of the better manufacturers. Very pricy new. Reman Mopar is available. Could jumper starter relay moving contacts, 85 and 87 when not turning over. If it then turns over, then starter is ok, other issue like park neutral, security system, starter relay, wiring harness etc.
-
Intermittent battery drain
John/Horace replied to Wilsonk uk's topic in Electrical, Battery & Charging
Could also buy a battery tender or trickle charger. Needs house power so extension cord, uses very little electricity. It stays always hooked up to battery when car is sitting. Will keep battery full without damaging it. Mechanics sometimes tie wrap them in place under hood with plug poking through grill for extension cord. Not that expensive to buy. Rather than squeeze clamps, the permanent mount style use bolt on spade connectors that mount right on power connections. If you go that route you could keep your cell hands free set up working, HFM fuse still in place. -
Buy a cheap assortment back of plastic Xmas tree style clips from auto parts store. They often crumble when reused. Could go auto wrecker route for bumper cover replacement and crash pad foam. . Use your paint code from drivers door to see if you can get a match. If you splice the rad cradle, you can pop rivet a few home made brackets in place. Better than sheet metal screws, don't come loose and cause rattles.
-
Intermittent battery drain
John/Horace replied to Wilsonk uk's topic in Electrical, Battery & Charging
Welcome to the forum. Sorry to hear about your cancer. My brother is on third go round with his, about 10 years now since the start. They are getting better with this disease, fingers crossed for you. You boosted your own Journey battery, very impressive . You seem to have done your reading on Journeys as well, smart. Newer cars with all their options tend to go through batteries. Short driving trips and sitting for weeks also tends to under charge batteries. A newer style of battery called AGM is being used on lots of cars now. It helps cover these issues. They are about $100 extra, worth considering. Same size foot print, compatible with current charging system. Last multiple times longer sitting than standard lead acid battery. In the short term there are things to do. If you can live without your cell phone working with radio. The HFM fuse should be pulled out from passenger front kick plate fuel panel. Most common source of parasitic battery drain. Very expensive to have repaired, pretty much dealer fix. Keep a charged booster pack like you have in your glove compartment. Or get an AAA membership. A bad washer pump shouldn't kill battery, but will need to be fixed. Make sure glovebox light is not staying on. Don't leave anything charging in charging outlets. -
Hopefully not a twin turbo turbo V6 from 2022-23 Toyotas. https://www.google.com/url?sa=t&rct=j&q=&esrc=s&source=web&cd=&ved=2ahUKEwjAvfuC-eKLAxW5v4kEHZhzBEsQFnoECBIQAQ&url=https%3A%2F%2Fwww.thedrive.com%2Fnews%2Ftoyota-will-replace-over-100000-v6-engines-in-recalled-tundras-lexus-suvs&usg=AOvVaw2Arqaz5rnjJ57LmGxTA151&opi=89978449
-
Steering pump saveable or better to replace
John/Horace replied to Ironshoe's topic in Engine & Transmission
https://www.rockauto.com/en/catalog/dodge,2018,journey,3.6l+v6,3440326,steering,power+steering+cooler,11350 Common leak also pressure line from pump.
-
'12 Journey slow to heat but decent once going
John/Horace replied to erbie78's topic in Climate Control
-12F or -24 C holy crap that's cold, block heater would help quite a bit on warm ups, save fuel too. Ours came with one, they are coiled up and hidden a bit from factory install. If you have the rear heat with the second heater core; I would keep it off until the front starts to warm up. Or tell her to leave it off all together. You didn't mention miles but a 2012 changing original stat wouldn't be a bad idea if it's over a 100k miles, coolant àlso aged out now. Do not mix hoat and oat, can create jell and wreck/plug heater cores. OAT is the newer 2013+ coolant, you are likely HOAT. Owners manual will say. Both are orangish color. HOAT is considered a superior anticorrosion coolant but pretty much discontinued. Rated life 10 yrs I think. If you flush really well you can switch to anything really. Like the OP's are saying...not enough warm up time at 1.5 miles really. -
These are a very peppy V6 engine, I don't think the 4 cylinders have this problem. I know you don't want to spend more money on vehicle right now. But this is a perfect opportunity to change the cps or crank position sensor with everything apart. Several hours of labor to fix this wear item if it goes later on. Dealer OEM is recommended (on burried hard to get at parts) and I think rockauto is around $35 delivered. Get mechanics feed back, would he do the same on his own vehicle. AWD makes it extra hard to change on this vehicle.
-
Fenwick is about 15mins away, I'm in another sleepy little town near by. Have first and second cousins in this area, my married daughter lives near by. We are Christians but not involved with local church, just liked their sense of humour on sign. Have run blower a few time in 24 hrs, almost a foot of snow in total, my drive and widows house two doors over. Not that cold fortunately, but big drop coming. I wonder about running summer diesel in your heating system. Less kerosene content and I think more energy output. Storing more barrels and moving them around probably too much hazzle.
-
I grew up in a house with oil furnace and separate oil hot water heater. Large oil tank under stairs inside house, vented outside. Faster heat up than even natural gas from a cold start on the water heater. Insurance companies really jack your house rates up here if you heat with oil in my area. Oil spill clean up risk etc, this week's excuse. Natural gas has taken over, some electric heat pumps getting gov subsidies so getting more common. Ground source heat pump set up is probably lowest annual cost, but up front install investment is crazy high; very long pay back. Large house lot also needed, not always practical. My back up is a big wood fireplace with heat recovery vents and a electric fan built in. If you have good hardwood, it will heat quite well. Wood free from my brother's lot, just have to cut and haul it. Always have some on hand. Only convenient reserve gas in unfortunately 45 mins away. If visiting grand kids I have a chance to grab some each way.
-
My older brothers wood stove chimney stopped drawing last week. Plugged with creosote, has to clean out at least every 3 yrs. Pacific Energy stove ( new effic design)fed through an old stone fireplace with stainless liner. Has natural gas but runs as a back up because he lives on 14 acres of bush and NG is pricy. Has been waiting for a warm up to clear chimney liner. I'm glad I'm 4 hrs away to not get sucked in to help. Two story icy roof fun fun fun. We need a quick thaw. https://www.facebook.com/share/p/18eVPky42k/
-
This side of the lake is no picnic either. I’m 25 mins from Erie and 20 from Ontario. My 10 HP small Briggs blower is getting lots of opportunities to make the snowman smile…this year. Not getting those periodic warm ups that make it more bearable.
-
You can check relay with multimeter, Google it. It's several sets of contacts and a coil, large amp feed contacts triggered by small amp feed contacts. Relays take the current surge when power is transfered to large draw items. Allows small wiring on all the dash switches to be used without it heating up and wearing out. My understanding anyway. I'm not an electrician or electronics tec.
-
Checking Battery / Alternator Voltage
John/Horace replied to DodgeaWrench's topic in Electrical, Battery & Charging
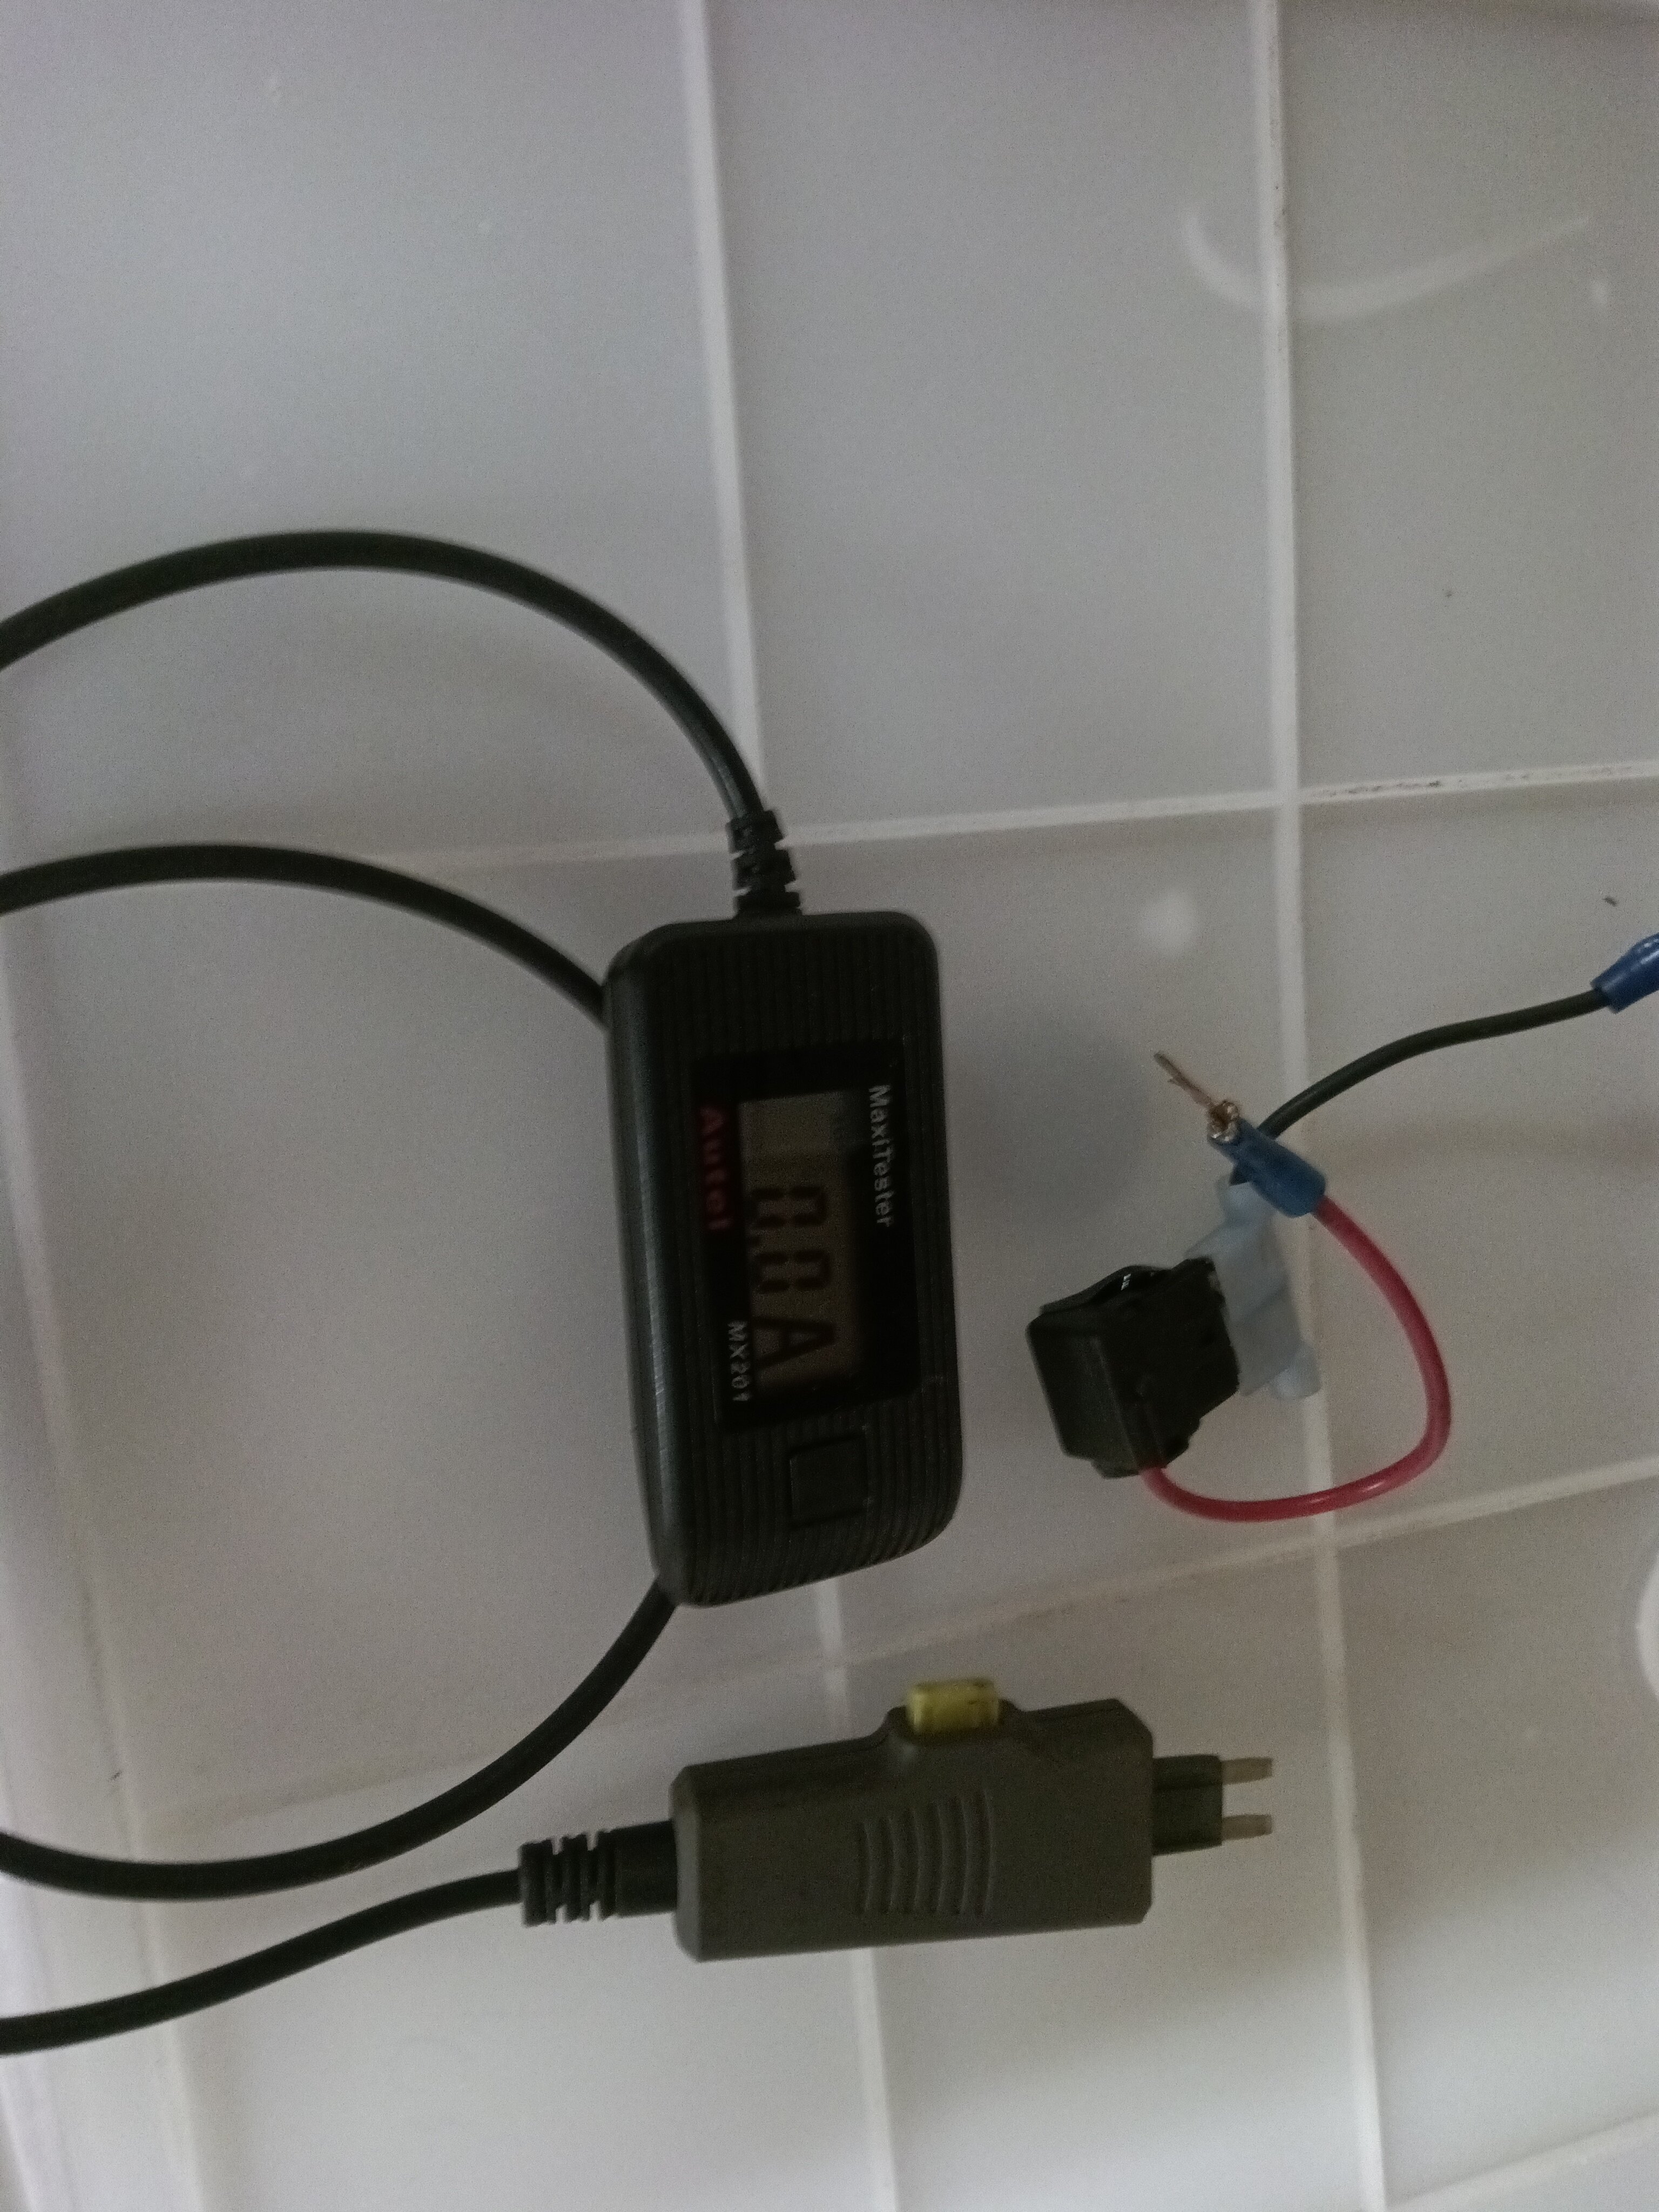
It faster than 15 mins for go to sleep mode on a Journey. The HVAC dash vents cycle to vent cabin and then close, around 2 mins and should be down to very little current. Digital clock, radio memory, keyless entry etc is less than 0.5 amp like your friends car. I think it's around 180 milli amps or 0.180 amp. From remote jump spot it sends power to main fuse panel and separate feed to alternator. So you could test alternator diodes (common parasitic load when they fail) using one feed wire and bad blue tooth module (Journey most common parasitic load issue) using other feed wire. There are even fuse load testers that can be used to isolate problems to just once fuse circuit. Pic is a Harbor Freight/Princess Auto fuse load tester that has saved my ass on a few occasions. Was around $25 ish Cdn pesos.````
-
Heat shields coming partially loose can be noisy. Need to add screws or stainless wire to reattach.