

Journeyman425
-
Posts
1,112 -
Joined
-
Last visited
-
Days Won
87
Content Type
Profiles
Forums
Gallery
Everything posted by Journeyman425
-
That is a beautiful Freemont you have there - very unique looking - nice job!
-
I feel like a godparent, seeing your DJ's picture finally after watching your car go from "D1" to Delivered over the last couple of months! Looking forward to more pictures! Looks beautiful. I always wanted to see a DJ with the chrome mouldings - looks great.
-

Battery saving mode
Journeyman425 replied to Chris1276's topic in Alarms, Keyless Entry, Key Fobs, Locks & Remote Start
Hmmm...Learn something new every day: STAR Case Chrysler Group LLC Version 1 Case Number: S1108000147 Release Date: 09/17/2011 Symptom/Vehicle Issue: Battery Saver Message Appears In The Evic Discussion: Battery saver message is being displayed in the EVIC of the cluster. Repair: Vehicles with EVIC warning display can display a battery saver message. The sensor on the battery reports battery (voltage, temperature, state of charge and amp-hours in/out etc.) to the CBC (Body Controller) on the LIN bus. The CBC sends a message to the cluster to indicate ‘battery saver active’ it indicates that the battery has lost >5 AH during an ignition cycle and may cause other component operation issues reducing component performance, blower speed, radio volume, window operation ect…as battery charge declines. -
You're the first person I've heard of to take delivery of a Crossroad! Congratulations and please post some pictures!
-
I believe that photo references the 2009-2010 model which uses a different rear fascia.
-
2014 Journey's brake are massive
Journeyman425 replied to TXcajun's topic in Brake, Chassis & Suspension
I'm really surprised to hear this. I wrote about my observations with the brakes on my Journey earlier on this thread. 17,800 miles and still the brakes perform as new with zero vibration and excellent pedal feel. They haul this car down to zero with seemingly no effort. They inspire greater confidence than the brakes in my 300M, which perform well but feel somewhat vague and not as powerful. If you already have vibration issues at 2K, that can be corrected under warranty for you. Consider having that repaired first before spending the money to upgrade. -
5 year 100000 km warranty
Journeyman425 replied to journeyfamily's topic in Buying, Leasing, Ordering & Competing Products
Well, for what it's worth - the tire psi monitoring system on my 2013 is quite accurate - the reading and the gauge are always within 1 psi of each other. I always check manually but the system is pretty much dead-on. -
Sure sounds to me like a tire issue - a broken cord or shifted belt inside the tire itself - either of which will cause a pull and a shimmy at the same time. When the car is up on the lift and the wheels are spun off of the ground, you'll be able to see the tire's out-of-round condition as it rotates. Based on what you're describing, I'd almost guarantee that replacement tires will solve both problems.
-
I use Photobucket to store pictures that I post here on the forum. In my Photobucket library, there are four buttons under each thumbnail. I right click on the button that says "direct" under the picture I want to post, then copy the URL in the button, then navigate back to this reply window. In the toolbar which appears above these words when you reply, there is an "image" icon. Click on that, and a window opens. Paste the URL in the window and hit post. Enjoy!
-
5 year 100000 km warranty
Journeyman425 replied to journeyfamily's topic in Buying, Leasing, Ordering & Competing Products
A little late to this thread - sorry. If you would like, send me the last eight digits of the VIN; I can check coverage for you. 57000 KM, correct? Is your ESP light still on or did that only come on once? It should not be tied into the low PSI light - ESP stays on even if the temporary spare is in place, unless you defeat it with the dash switch or if a component in the ESP system has failed, then the warning light will illuminate. -
I have an iPhone 4S. I usually listen to streaming music via Bluetooth. Occasionally, I'll connect it to the car via the USB port. When I do, it behaves like yours - always begins with the same song - Airstream by Pat Metheny. While it plays, the system reads the contents of the library like yours and the browse feature and album artwork, etc is not available until it is done. This often takes a couple of minutes at least. There was a recent software update to my iPhone but I don't think I've connected it via cable since then. I'll try it sometime this week and see if it behaves differently. The reconfiguration to the DRL (you're welcome! ) should not have had any bearing whatsoever on the media system's behavior. It is really not an update, but more akin to adding a registry file like on a Windows-based PC.
-
It has to clear the spare tire which is immediately behind the bumper fascia. I don't like the way it looks, either - the rear fascia is clean and sporty without it. The hitch robs the sporty look of the dual exhaust - you almost don't notice it because of the hitch. We tow a pop-up camper with ours so it was a necessity. The Curt hitch is a bit less angular but it still protrudes. I wish it were somehow integrated into the rear fascia like the Grand Cherokee and Durango.
-
 I think that's a very tasteful, sporty update to the look of your Journey - really underscores the Dodge image. I would also love to see pics of your Turbo Trans Am - that's a 20th Anniversary car, isn't it? It has the GTA look with a modified Buick GNX drivetrain, correct?
 -
You might have to, although there have been some folks here on this Forum that have added aftermarket wiring to their Journeys and have not have to reconfigure the car to enable them. If they do not work after properly installing the wiring, then let me know and I'll add the code for you. Afterwards, you'll have to do the same and return for a reconfiguration.
-
Amusing indeed! Happy that the restoration worked - no reason why it shouldn't - the only thing I haven't figured out yet is why the sales code has disappeared from the 2014 options lists. I'm working on that... Chrysler is pretty vague when discussing the DRL activation. The US model owner's manuals simply state that, if the model is equipped with DRL then they can be toggled on and off with the touch screen. But they don't say how to enable them or that a dealer visit is required to activate them. It's almost like we at the dealership had to discover this by accident. I found one document on the Chrysler side after an extensive search which gave instructions about adding a sales code to the options list and then reconfiguring the car so they work. I wrote to the Chrysler STAR center last week about the missing 2014 sales code, and how do I make them work. I received a quick, rather cryptic reply that if the code isn't there then it is not possible to enable them. I don't buy it. I'm convinced that there is a way. Same issue with my trailer tow harness. I factory ordered the car with the trailer tow prep group. We had to connect the supplied tow harness to the existing wiring when the hitch was installed. No problem, right? Well, hooked up a tester to the trailer lights and they did not work. Fuse is in place, not blown, and there is only one way to connect the harness. So, why don't they work? Same reason as the DRL - we had to add a sales code for a Mopar trailer hitch and then restore the car and sure enough, now they work. This baffled me to no end. Why on earth would we have to add this sales code to make the car work when the car was ordered and built with the trailer tow group already??? And...trailer tow prep group is listed in the options already!! If I ordered it that way, then I'm going to tow with it - duh! Anyway - they (your dealership) probably did not realize that the DRL does not come on unless the car is running and shifted into gear. When in park, the lights are off. They started the car after the reconfiguration and saw that the lights were off and concluded that they didn't work. Also, don't forget that when you have a turn signal on, the corresponding DRL goes off so that oncoming traffic can clearly see the turn signal flashing. Once the signal cancels the light comes back on. Enjoy!
-
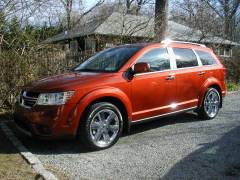
From the album: Journeyman's 2013 Copper Pearl Crew
-
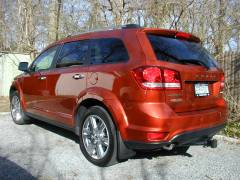
From the album: Journeyman's 2013 Copper Pearl Crew
-
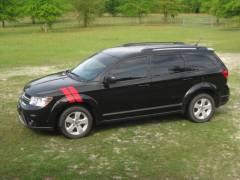
Blacked out Lights and Grill
Journeyman425 commented on DTSGUY's gallery image in Dodge Journey Member Albums
 Very Cool!
 -
Code has been added. Have your dealer perform a reconfiguration, also known as a restoration after they program your new key and the DRL shoud work.
-
Hope this helps. Note - when I copy and paste from the manual, the diagrams go from a chart layout to everything running together - sorry! AMPLIFIER-RADIO C1 Harness Family: Body Cavities: 40 Color: NATURAL Gender: FEMALE Part Description: 13592526 Engineering Name: Mod_Audio_Amplifier_12_Ch_8_Ch Connector No: D3804A Option: Standard Available Views:Location View Pin Circuit Wire Color Gauge/Size Function Option 1 Z908 BK/GY 1 GROUND 1 Z908 BK/GY 16 GROUND 1 Z908 BK/PK 16 GROUND 2 D467 GY/DB .35 CAN(+) PRIVATE BUS FOR AUDIO TELEMATICS 2 D467 GY/DB 22 CAN(+) PRIVATE BUS FOR AUDIO TELEMATICS 3 NO N/A No Connect 4 X51 DG/DB .50 LEFT REAR SPEAKER (+) 4 X51 DG/DB 20 LEFT REAR SPEAKER (+) 5 X52 GY/DB .50 RIGHT REAR SPEAKER (+) 5 X52 GY/DB 20 RIGHT REAR SPEAKER (+) 6 X53 DG .50 RADIO LEFT FRONT AUDIO (+) 6 X53 DG 20 RADIO LEFT FRONT AUDIO (+) 7 X54 GY .50 RADIO RIGHT FRONT AUDIO (+) 7 X54 GY 20 RADIO RIGHT FRONT AUDIO (+) 8 X298 GY/LG .80 AMPLIFIED RIGHT I/P SPEAKER (-) 8 X298 GY/LG 18 AMPLIFIED RIGHT I/P SPEAKER (-) 9 X299 GY/YL .80 AMPLIFIED LEFT I/P SPEAKER (-) 9 X299 GY/YL 18 AMPLIFIED LEFT I/P SPEAKER (-) 10 NO N/A No Connect 11 NO N/A No Connect 12 A931 RD 1 FUSED B(+) 12 A931 RD 12 FUSED B(+) 12 A931 RD 16 FUSED B(+) 13 D466 GY/YL .35 CAN(-) PRIVATE BUS FOR AUDIO TELEMATICS 13 D466 GY/YL 22 CAN(-) PRIVATE BUS FOR AUDIO TELEMATICS 14 NO N/A No Connect 15 X57 DG/OR .50 LEFT REAR SPEAKER (-) 15 X57 DG/OR 20 LEFT REAR SPEAKER (-) 16 X58 GY/OR .50 RIGHT REAR SPEAKER (-) 16 X58 GY/OR 20 RIGHT REAR SPEAKER (-) 17 X55 DG/BR .50 RADIO LEFT FRONT AUDIO (-) 17 X55 DG/BR 20 RADIO LEFT FRONT AUDIO (-) 18 X56 GY/BR .50 RADIO RIGHT FRONT AUDIO (-) 18 X56 GY/BR 20 RADIO RIGHT FRONT AUDIO (-) 19 X208 GY/DG .80 AMPLIFIED RIGHT I/P SPEAKER (+) 19 X208 GY/DG 18 AMPLIFIED RIGHT I/P SPEAKER (+) 20 X209 GY/OR .80 AMPLIFIED LEFT I/P SPEAKER (+) 20 X209 GY/OR 18 AMPLIFIED LEFT I/P SPEAKER (+) 21 NO N/A No Connect 22 NO N/A No Connect AMPLIFIER-RADIO C2 Harness Family: Body Cavities: 28 Color: BLACK Gender: FEMALE Part Description: 175966-2 Engineering Name: Mod_Audio_Amplifier_12_Ch_8_Ch Connector No: D3804B Option: Standard Available Views:Location View Pin Circuit Wire Color Gauge/Size Function Option 1 NO N/A No Connect 2 NO N/A No Connect 3 X301 GY/WT .80 AMPLIFIED SUBWOOFER 2 (+) 3 X301 GY/WT 18 AMPLIFIED SUBWOOFER 2 (+) 4 X206 DG/LG .80 RIGHT REAR SPEAKER (+) 4 X206 DG/LG 18 RIGHT REAR SPEAKER (+) 5 X295 GY/DG .80 LEFT REAR SPEAKER (-) 5 X295 GY/DG 18 LEFT REAR SPEAKER (-) 6 X390 DG/BR .80 AMPLIFIED SUBWOOFER 1 (-) 6 X390 DG/BR 18 AMPLIFIED SUBWOOFER 1 (-) 7 X202 DG/VT .80 RIGHT FRONT SPEAKER (+) 7 X202 DG/VT 18 RIGHT FRONT SPEAKER (+) 8 X201 GY/VT .80 LEFT FRONT SPEAKER (+) 8 X201 GY/VT 18 LEFT FRONT SPEAKER (+) 9 NO N/A No Connect 10 NO N/A No Connect 11 X391 DG/WT .80 AMPLIFIED SUBWOOFER 2 (-) 11 X391 DG/WT 18 AMPLIFIED SUBWOOFER 2 (-) 12 X296 DG/GY .80 RIGHT REAR SPEAKER (-) 12 X296 DG/GY 18 RIGHT REAR SPEAKER (-) 13 X205 GY/LG .80 LEFT REAR SPEAKER (+) 13 X205 GY/LG 18 LEFT REAR SPEAKER (+) 14 X300 GY/BR .80 AMPLIFIED SUBWOOFER 1 (+) 14 X300 GY/BR 18 AMPLIFIED SUBWOOFER 1 (+) 15 X292 DG/YL .80 RIGHT FRONT SPEAKER (-) 15 X292 DG/YL 18 RIGHT FRONT SPEAKER (-) 16 X291 GY/YL .80 LEFT FRONT SPEAKER (-) 16 X291 GY/YL 18 LEFT FRONT SPEAKER (-)
-
This is the OEM Mopar hitch. The left side of the draw bar had a bracket which hung down to accomodate a seven way plug. I use a four way flat, and the bracket is ugly so we whizzed it off in my shop and painted over the welds.
-
Mopar Total Clean might work. I love this stuff - I have the black leather interior, and with my kids in and out of the car everyday it gets filthy in a hurry. Total Clean gets all the dirt and does not affect the leather or the finish of the plastics in any way and gets everything clean.
-
Hello friends - Just wanted to wish everyone a Happy Easter! Traveling 250 miles tomorrow to see family. Don't tell 'em this, but I'm almost as happy to take a road trip in the DJ as I am to visit the family... Had to hit it with the Miami Shine before the trip, of course!
-
How to disconnect negative battery cable
Journeyman425 replied to Totemus's topic in Accessories, Modifications
It appears that the electrical system will be shut down if you simply disconnect the negative jump terminal under the hood. From the manual: 08 - Electrical/8F - Engine Systems/Battery System/BATTERY/Removal REMOVAL WARNING: To protect the hands from battery acid, a suitable pair of heavy duty rubber gloves should be worn when removing or servicing a battery. Safety glasses also should be worn. WARNING: Remove metallic jewelry to avoid injury by accidental arcing of battery current. CAUTION: The negative battery cable remote terminal (2) must be disconnected and isolated from the remote battery post (1) prior to service of the vehicle electrical systems. The negative battery cable remote terminal can be isolated by using the supplied isolation hole (3) in the terminal casing. Disconnect and isolate the negative battery cable remote terminal from the remote battery post. -
Still love my Stone White M:
